Your cart is currently empty!
Add an Interactive Map to Your Website
We’re working with Brent Wehmeyer of KC Local Online on a new website for Vini Soletta, the import business of Italian winery Tenute Soletta. Their existing site has limited content and doesn’t come up well in a search for their company name, even though they are a well established company which has been providing imported wines for fine restaurants in Los Angeles for more than a decade. Now, they intend to expand into direct retail sales of their wines through ecommerce, so Brent is helping them improve their online presence.
Among the things the client wants for their new site is an interactive map. The map they have been using on their current site is shown below. They wanted to make this map clickable, so that someone clicking on Toscana would be taken to the company’s page of Tuscan wines. This is entirely practical. We considered several options for accomplishing this.
Option 1: an image map
The client’s first thought was to use the old fashioned image map. This technique uses coordinates in html to link different areas of an image to different places online. There were two problems with using this technique. The first is that it’s old fashioned. I did this for an assignment in web design class, and I have never seen it done since. While it still works, as far as I know, there are dangers with using old style code, because browser updates can make it stop working without warning. It also would be very bulky code, which can slow down load times and confuse the search engines.

The second problem is that there are only seven regions with wine pages to click through to in the website, and almost three times as many regions on the map image. There is no way to show which regions are clickable, so visitors would have to use trial and error. While “Keep your code lean and clean” is a basic rule of web design, “Don’t frustrate your visitors is the basic rule of web design, so that option was not a good choice.
Option 2: text links
The second option I considered was to redo the picture without the labels of the regions, and add text links to the pages. This would have the advantage of providing more information about the company for search engines, since the names of the wine producing regions of Italy would support the primary keyword, “Italian wines.”
However, it would leave us with the same problem in terms of usability. While I could make the regional labels which were links look different from those which were not, many visitors would still expect all the labels to function in the same way. We could add instructions, but another basic rule of web design is, “If it needs instructions, it’s not well designed.” Goodbye to option #2.
Option 3: embed an interactive map
The best choice, we decided, was to embed an interactive map. We used Google Maps. There are other options, including plenty of specialized software, or building your own Flash or JQuery maps, but Google Maps is very easy to use.
- Go to Google Maps (click the link above) and click on “My Places,” circled on the screenshot below. If you are not signed in, you will be prompted to sign in and, if necessary, to create a Google account.

- You will see a nice large button for “Create Map.” Click on it.

- Now you fill in the form. Let’s go from top to bottom. Search for the place you want to map in the search bar. Type in the title for your map in the box labeled “Title,” add a description in the box labeled “Description.” I typed “Italy” in the search box, “Italian Wines” in the title box, and a simple description in the description box.

- Just at the bottom of the screen shot above you can see radio buttons to choose “Public” or “Unlisted” status for your map. If you want to add to the sum total of knowledge about the world with your map, you can make it public and everyone will be able to see it. If it’s a private map, choose “Unlisted.” While information about the wines of Italy might be good for everyone to have, our map links to ecommerce pages. We don’t want to hijack casual visitors and take them to an ad page, so we made the map unlisted. If you just want a map of a particular area, you’re through. You can, however, customize your map in a variety of ways.

- Circled in the screenshot above are the tools for customizing your map. The hand allows you to move the center of the map. The map pin shape allows you to add placemarks. I’ll show you that in more detail below. The line allows you to draw lines on your map. For example, you could draw the edges of your service region or show the best way to drive from one place to another.

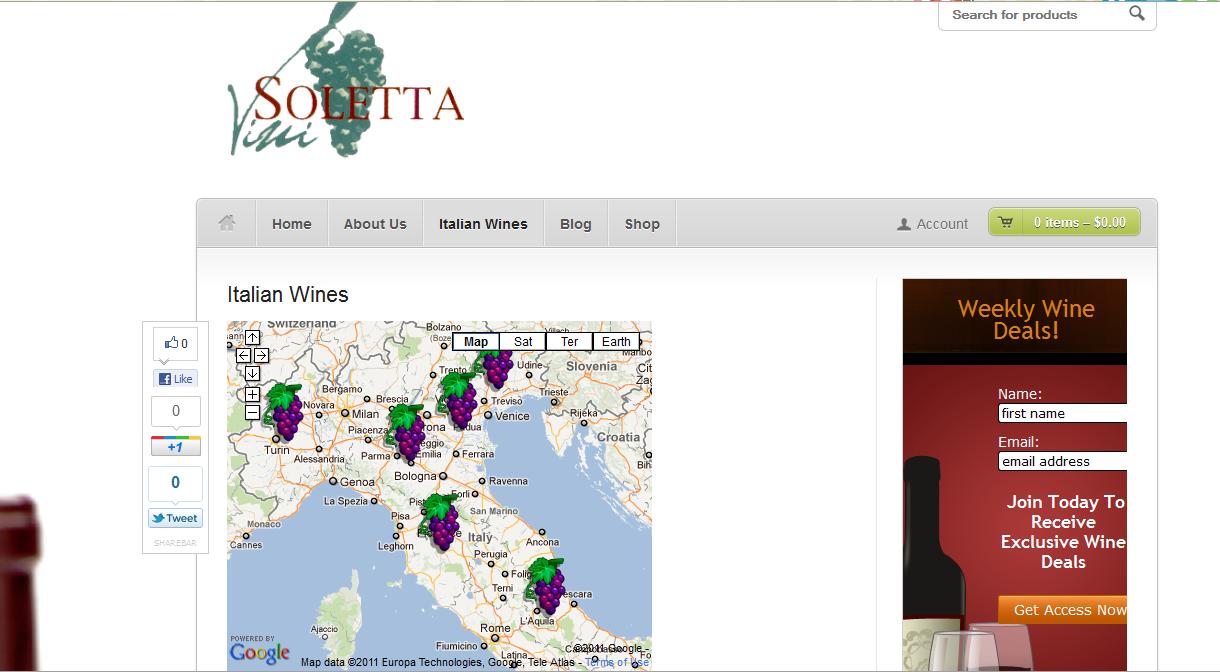
- When you click on the placemarker, you can drag it and put it onto the map wherever you want it. Once it’s placed, click on it to open a text box. Here you can add more information. For the Italian wine map, I gave information about the specific wines Vini Soletta carries for the region I was marking, and linked the text to the appropriate page in their shop. As you can see below, clicking on a placemarker for the wine map lets the visitor go directly to the page for their favorite wine producing region.

- If you look back at the dialogue box, you can see that you have a choice of plain text, rich text, or html. I wanted to keep the code light, so I used html simply to add the links, but you can customize the balloon that opens on clicking the placemark as much as you like. Fellow Pangaean Beryl Reid changed the plain placemarkers to grape clusters and we like that (Thanks, Beryl!).

- As you can see above, you can also collaborate and import. When you finish, click “Done.” Your completed custom map will be saved in My Places, and you will find it whenever you return to Google Maps. This is useful for planning an itinerary, sharing your favorite climbs with friends, or any other custom map task you might care to undertake.

- Next, embed the map into your website. To do this, click on the link icon at the upper right hand corner of your screen. You will see the code generated for you, just as when you embed a YouTube video.

- The first choice above is the web address of your map, in case you want to tweet it or link to it. The second choice is the code for embedding the map. You must have access to the html at your site to embed this. Below the code you can see the link to “Customize and preview embedded map.” This allows you to choose the size for the map on your page — or of course you can just change the pixel sizes in the html. If you are adding it through a CMS or blog, just be sure to paste it into the hmtl view, not the visual editor. If you don’t have access to the html, or you don’t feel comfortable with it, send it to your webmaster.
Now you have a custom map embedded in your website. Google Maps are in an iframe, so you don’t get SEO benefits from text on the map. However, you also don’t have to support the whole map in your website (though the map will still be slow to load if you have a whole lot of text or html), and it will update automatically when you update the map in My Places. It can also be opened in Google Earth, where it has a different look:

by
Tags:
Comments
One response to “Add an Interactive Map to Your Website”
[…] Add An Interactive Map To Your Website […]
Leave a Reply